Publishing Add-Ons To StorePublishing functionality described in this article is temporarily available for free assets only.
To publish add-ons you should become a publisher. If you are still not for some reason, please follow these instructions to become one. First of all you should prepare your add-ons (3D models, textures, templates, etc.) for sharing them with others (i.e. extract all necessary content from your UNIGINE project and pack in a *.upackage file). Instructions on how to do it as well as publishing requirements are given here. There is a basic workflow to publish your add-ons to the UNIGINE Add-On Store:
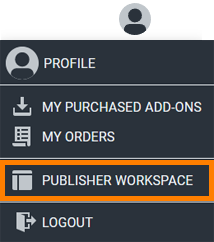
Once you have your packages on the Add-On Store, you can browse their complete list or search for a particular one, you can also change add-on title to improve discoverability, or move an already published add-on to archive (e.g. if it's outdated or for any other reason). 1. Create New Add-On DraftFirst, you should go to the Publisher Workspace page (click on your account avatar in the upper-right corner of the page and choose Publisher Workspace).
You'll see the following page:
To add your new add-on to the Add-On Store click Create Add-On (D in the picture above) on the My Uploaded Add-Ons tab and fill in the following form:
As you fill all the fields click Create Add-On.
After add-on creation its draft version will be added to the list of published add-ons with the Draft status (marked with beige color). And editing form will open to clarify the add-on details. 2. Finalize Add-On DetailsWhile the add-on is a draft you can edit its general information. BASE INFO
You can edit base information about the add-on version (everything that you have already specified when creating it). For that click Edit Base Info (see the picture above, B) and edit everything you need according to the Create Add-On form. Click Save Base Info to save changes (see the picture below).
MEDIA To add a cover or any auxiliary media (pictures, videos) click the Media tab and the plus sign in the appropriate place. Select the file on your computer and add it to your add-on media by clicking Open. These changes will be saved automatically (see the picture below).
PACKAGE Switch to the Package tab. It enables you to upload packages for your add-on to be published. Your add-on can have multiple packages (*.upackage files) for different combinations of supported operating systems and SDK versions. You can add separate *.upackage files for Windows and Linux, or you can update your add-on to support new SDK version and upload the latest *.upackage file for it. So, your customers will be able choose the appropriate version for them from the ones you made available. So, to upload an add-on package that you have prepared, in the Package tab click Add Package.
In the pop-up window fill all required fields:
Then click Upload Package to add the package with additional information to your add-on.
The specified package file will be uploaded (the process can take a few minutes depending on the *.upackage file size). Meanwhile, you can add other *.upackage files as the previous file is uploading. Just click Add Package and repeat the actions described above.
After adding all *.upackage files to your add-on, you should wait for their download to complete. All uploaded files will be saved automatically (see the picture below). Then you can edit information for any of the uploaded *.upackage files by clicking Edit Info. You can check the package file by clicking Download Package and replace it with another file via Replace Package. You can hide the package from the list of add-on's packages by selecting the box Hide Package or completely remove it from the list by clicking Delete Package.
CHANGELOG Here you can describe any updates that triggered a version change, e.g. changes to match a new supported SDK version, bug fixes, or new features added. Changelog shows that your add-on package evolves. To add a changelog note click the Changelog tab and Edit Changelog. Fill the changelog box and click Save.
3. Submit Add-On for ModerationYou can't publish an empty add-on version. It must contain required data: media, cover and add-on package.
Click Publish to publish all changes. Your add-on version will be submitted for moderation. You can return it to a draft version (with the ability to edit it) by clicking Withdraw (see the picture below).
4. Wait for Moderation ResultsAfter you submit your package for moderation to the Add-On Store, its status is changed from Draft to Moderation. Moderation involves checking the contents of the submitted package by UNIGINE. If everything is ok, the submitted version of your add-on package will be published and available for purchasing by other users. You will receive an e-mail notification confirming the add-on publication.
Otherwise (in case of invalid or inappropriate content) the submitted version will be banned. To see the publishing status of your add-on, open the My Uploaded Add-Ons tab. There you can see a list of packages waiting for moderation, published, banned, and others. My Uploaded Add-Ons Tab
Add-On Store keeps information about all previously published add-ons with different statuses. All your recently published add-ons are listed in the My Uploaded Add-Ons tab of the publisher workspace. This tab contains the main page with a list of add-ons marked by different colors depending on their statuses (see the picture above):
Moreover, add-on versions can have their own statuses. For example, you update your add-on in the Add-On Store, its old version can be already published and still available to purchase, while the new one is just being created. In this case the status of your add-on will be Published (see the picture above, B), while its version will be marked as Draft (see the picture above, A). Searching Add-Ons
It can be extremely difficult to find a particular add-on in a huge list without special instruments. UNIGINE Add-On Store provides tools to help organize and find what you need. In the process of searching for add-ons you can use the following methods: SORTINGYou can choose the most suitable sorting method for your submitted add-on search (see the picture above, B). For example, you want to find add-ons that you have already submitted for publication, which have been banned for some reasons in the process of moderation. Use Sort by Status to sort the list of submitted add-ons. Add-ons with the Banned status will be at the bottom of the add-ons list on the last page. You can review the issues reported by the moderator, fix them, and then submit your add-on for publication again. Generally, there are two sorting methods available:
USING FILTERSSometimes it is not enough to just sort add-ons to find the ones you need (see the picture above, C). For example, you need to find an add-on available for the 2.17 SDK version with the Sim edition that belongs to the VFX category. For more relevant results you can use filters on the right sidebar. Filters enable you to choose suitable technical properties: SDK version, product edition, category, and status of the add-on. Additionally, you can use tags to narrow down the scope even more. Tags are created for each add-on by the publisher and briefly reflect the main idea of the add-on. They are added to the common public list and can be used by all users of the Add-On Store to search a file. To drop all filters just click Clear Filter. USING SEARCH BOXYou can also use keywords to find add-ons you need, just type them in the search field and press Enter — the list of add-ons containing these keywords will be shown (see the picture above, a box in C). Keywords can be contained in the title of the add-on, in its description, or in the supported file title from the package. In either case, all add-ons matching the search criteria will be displayed as a list on the screen. To clear the search line just click Clear Filter. Changing Add-On Title and PriceAfter publishing your add-on, you may need to change its title in order to improve discoverability for customers, fix a typo, or for any other reason. Or you can change or set a price and discounts. Find your add-on in the list of your published add-ons and select it. You can change the title of an add-on regardless of its status.
Click
After editing click Save to save all your changes. Moving Add-On Version To ArchiveIf you want to hide your published add-on from customers or cancel the publishing process of a currently moderated add-on, you should move it to Archive. Then the add-on will not be displayed in the library of add-ons available for purchase or will be removed from the moderation, respectively. To move the add-on version to archive at every point of its existence (regardless of its current status) click Archive on the add-on page.
The add-on will change its status to Archived and another button Get From Archive will appear on the add-on card. Click it if you want to return your add-on version back from the archive and make it active.
Response to ReviewsOther users can evaluate add-ons that you publish, rate them and leave comments. You can see the list of ratings and comments for all of your add-ons and reply to them on the Reviews page of your Publisher Workspace menu. All comments are checked for deliberately false information, rude, obscene language, insults, as well as calls and statements that violate existing legislation. New comments appear on the add-on and Reviews pages with a 10-minutes delay after submission, as checking process takes some time. Comments violating the law are removed immediately. The Reviews tab contains the list of reviews for your published add-ons. You can sort reviews by date, rating score, or add-on title alphabetically using the sorting tool (A in the picture below). You can also use filters on the right (B) to find necessary add-on reviews (type an add-on name and choose reviews you want to see, replied, unreplied, or all of them).
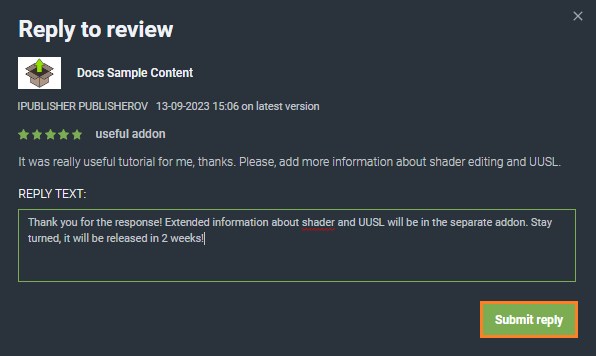
The Reviews tab Check the list of reviews on your add-ons. Each containing user name, date and time of publication, add-on version, rating score, and a comment. As an publisher you can reply to these comments or report them as inappropriate or abusive. To reply to a review click Reply (A). To report click Report (B).
To reply to a comment type the text of your answer in the appropriate box of the pop-up window that appears and click Submit reply.
Once submitted, your reply along with the date and time will appear under the comment you replied to. You can edit your reply later if necessary by clicking Edit reply.
The edit form similar to the Reply form shown above will appear in a pop-up window. After editing your reply, click Submit reply and your reply will be updated. Your customers can update their comments too. All your replies to an updated comment are removed (as this comment is treated as a new one), you should submit your reply to it again, taking into account the changes. TagsTags help others find add-ons you publish in the Add-On Store library. You can define a list of tags to make your add-on easy to find. You should add tags to the add-on when creating or editing its unpublished version. After publishing your add-on, you can't make any changes to any part of its description (including the list of tags). Changes are allowed for draft versions. If you want to update the description of a published add-on you'll have to create a new version of this add-on with a new description.
Firstly, you should analyze the way your customers think when they're trying to find the add-on. The tag that you add should narrow down the search scope and help customers get what they need by picking from the full list of add-ons only the ones having this tag. For example, if you publish textures of the surface of fossil materials such as iron, copper, tin, zink, nickel, etc., don't use “materials” as a tag. “Materials” is the name of the category in the Add-On Store, and a lot of add-ons belong to this category. You can use “fossil” and any other tags that describe your own add-on and distinguish it from others. Add-On Store keeps all tags added by different publishers in a common list (without duplicates of course). To add a tag to your add-on — just start typing it in the TAGS field and select the one you need from the pop-up list (see the picture below).
In case your tag does not exist in the common list (i.e., no one has used it yet) it will be added, and will become available for other publishers as well. So, simply type it in the TAGS field, and click Enter if there are no suitable suggestions.
New tag is added How to Set a PriceIt is up to the publisher to decide what price they set for an add-on. However, you might need to know how the obtained sum of money is distributed between the participants of the sales process. The following agents receive a certain percentage of the paid amount of money:
Let's assume you set USD 100 as an add-on price. In this case, the resulting amount that you receive on your bank account is around USD 70-75. The VAT or a similar tax is added automatically to the price set by the publisher when the user buys the add-on. |
What's on This Page:
|


 in the header. In the form that opens, enter a new title in the