How To Submit an Editor Plugin
Suppose you developed your own plugin for UNIGINE Editor, which extends Editor's functionality. Your plugin can be built using some third-party libraries, it can as well contain and use some additional content (like images, or template models for procedural generation, etc.). You may decide to share your plugin in a binary-only form, or to add related documentation that you've written for it, or maybe you would like to supply your source code to share it with others as well. To submit such an add-on you should perform the following three steps:
- Compile your code and build the binaries.
- Prepare a package file for your add-on in the Editor (pack binaries and additional content if any).
- Create an add-on with your package on the Store and submit it for approval.
1. Building Your Plugin
Editor plugins are developed only in C++ using Qt5.12.3 (important for stable Editor operation). CMake build system is recommended. Debug binaries should be compiled as release ones containing debug info with debug information and optimizations. You can find more details on creating Editor plugins, in the related documentation.
-
Depending on what your plugin supports, build the binaries for:
- Release version
- Debug version
- Required precision — float/double/both
- Required platform — Windows/Linux
-
Check that all binaries are named properly:
<DeveloperName><PluginName>_editorplugin[PRECISION]_x64[BUILD_VERSION] (no spaces here!)
- <DeveloperName> - your nickname on Add-On Store
- <PluginName> - actual name of your plugin
- [PRECISION] - _double for double precision (nothing - for float)
- [BUILD_VERSION] - d for debug version (nothing - for release)
Examples:
- lib<DeveloperName><PluginName>_editorplugin_double_x64.so
(release build with double precision for Linux)
- <DeveloperName><PluginName>_editorplugin_double_x64.dll
(release build with double precision for Windows)
- <DeveloperName><PluginName>_editorplugin_x64d.dll
(debug build with float precision for Windows)
lib - prefix for Linux binaries. The extension of the file in this case is .so .
-
Make sure that all binaries along with, their dependencies (if any), and .pdb-files for debugging are placed in the same folder bin/plugins/<DeveloperName>/<PluginName>/ of a single UNIGINE-project (let's call it "Main"). Copy them manually, if necessary (e.g. in case you have versions of your plugin for different platforms and precision stored in different UNIGINE-projects).
-
The plugin's source code should be located in source/plugins/<DeveloperName>/<PluginName>/.
-
Make sure that all plugin-related files (documentation, external libraries, additional content, etc.) are stored in proper folders:
- data/plugins/<DeveloperName>/<PluginName>/ - plugin-related content files
- include/plugins/<DeveloperName>/<PluginName>/ - extension files
- lib/plugins/<DeveloperName>/<PluginName>/ - *.lib files (third-party libraries)
- docs/plugins/<DeveloperName>/<PluginName>/ - README.md file with project description or other documentation.
As you have built all desired versions of your plugin and put necessary additional files to required locations, you can proceed to the next step. If you need more details on naming convention, recommendations, or required folder structure, or in case your add-on has a more complex structure than described here, please refer to this article.
2. Preparing a Package
Now, you should put your plugin and all you want to share into a package (file with the .upackage extension). So, do the following:
- In UNIGINE Editor open your Main project (the one that contains all necessary plugin binaries and additional files stored in accordance with the folder structure described above) and choose Packages -> Export Package in the main menu.

-
The Export Package window is empty now. Click Add External Files to add the binaries of your plugin to the package.

In the dialog that opens find the bin/plugins/<DeveloperName>/<PluginName>/ folder, select it, and click Open.
All binary files - for Windows OS or Linux OS, with float or double precision (depending on what your plugin supports) should be located inside this folder.

-
Your add-on can also include additional files (documentation, source code, external libraries required for your plugin, etc.). Skip this step, if you don't have such files. Otherwise, you can add necessary ones to the package by clicking Add External Files and selecting the corresponding folder from the ones listed below (just like you did for the binaries):
- Source Code:
source/plugins/<DeveloperName>/<PluginName>/
- Documentation:
docs/plugins/<DeveloperName>/<PluginName>/
- External Libraries:
include/plugins/<DeveloperName>/<PluginName>/
lib/plugins/<DeveloperName>/<PluginName>/
-
Skip this step as well, if your plugin does not use additional content (materials, textures, 3D models, or C# logic components). Otherwise, make sure that all these files are in the following project folder:

Click Add Files From Asset Browser.

In the dialog that opens select the abovementioned folder and click Ok to add these content files to your package.

-
When all reqiured folders and files are added, you can pack them together by clicking Export Package.

-
In the dialog that appears specify a name and destination directory for your package, and click Save.

Your add-on package (.upackage) is ready to be submitted!
3. Submitting the Add-On with Your Package
To publish your add-on with the package that you've just created, go to https://store.unigine.com/, click Sign In and enter your credentials.

After logging in, do the following:
-
If you are not a publisher yet, be sure to follow this guide first to become one. Otherwise, proceed to the next step.
-
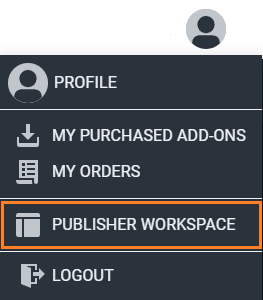
Go to Publisher Workspace by clicking on your avatar at the top menu bar and selecting the corresponding option:
- In the Publisher Workspace, click + Create Add-On.

- Fill in the form: make sure to select suitable categories (e.g., Plugins and 3D Models) and the required license for your developed add-on according to the required components for the add-on usage. Read detailed features about each edition in the table and select the appropriate one in the form. As soon as you’ve finished, click Create Add-On.

-
On the Add-On Draft page that opens, go to the Media tab to add the cover image and other related media.
You have to add at least one image or video, otherwise the add-on won’t be published!
Add a media file by clicking (+) in the corresponding section and choosing a file from your computer or specifying a link to a YouTube video.

- Go to the Package tab, click Add Package and choose the package that you've created earlier (*.upackage file).

- In the pop-up window fill all required fields: click Select Uрackage and select the package that you've created earlier (*.upackage file), select the appropriate SDK version and Operating System, and set Source Code to C++. Click Upload Package to add it to the add-on.

Your add-on can have multiple *.upackage files for different Operating Systems and SDK versions.
- Click Publish to submit your add-on for approval (the procedure is called Moderation).

-
Wait for moderation results. This is a mandatory verification procedure that takes some time before publication. After reviewing your add-on UNIGINE team either approves it or provides feedback for resubmission.
If you decide to change something in the add-on sent for moderation, click Withdraw and it will return to the Draft status. After making changes, send it for moderation once again.

As your add-on is approved it is published automatically and you get an email notification. Congratulations!
|
|